
9am - 5pm PST, Mon. - Fri.
Select images as shown from Somerset Clip Art CD (available only through a multi-year subscription of Somerset Studio magazine) or you may use digital clip art of your own source. Using Photoshop, Photoshop Elements or other image manipulating software, re-size and color-correct images* as desired and place as many images possible side by side on 8 1/2" x 11" format. Create three different sheets full of images. Press each sheet of Vintage Workshop Cotton Canvas with warm iron on paper-backing side, to flatten and prevent jamming inkjet printer. Using inkjet printer, print clip art re-formatted pages onto cotton canvas. Without removing paper backing, trim around each image. Since we will be adhering the fabric to a paper mache book, we will be leaving the paper backing. (Remove paper backing at this stage if you plan to create similar canvas patchwork quilt for other projects.)
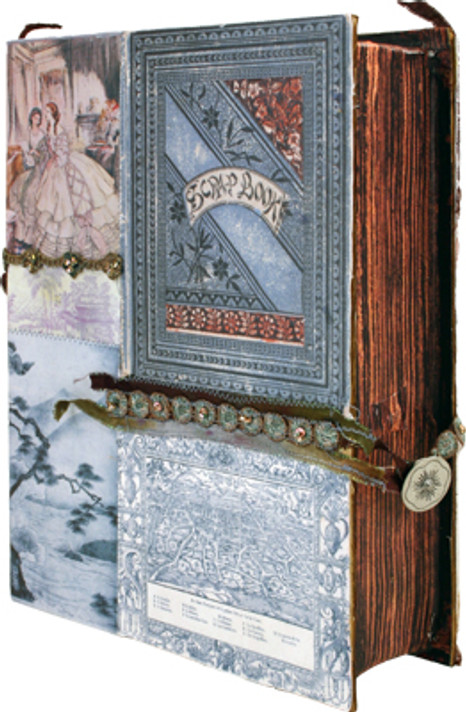
Using the "cover" of the Large Paper Mache Book as a template, creatively place pieces of clip art canvas pieces in patchwork, overlapping where necessary. Fill empty spaces with lengths ribbon trim of ribbon from the Bronze Mist Collage Card . Begin assembly of fabric patchwork quilt book cover by slightly overlapping pieces of the canvas clip art, and using the "G" large zigzag setting on the Janome Sew Petite in complementary thread colors, and stitch, finishing beginning and end with backward stitches. Sew trims with "G" zigzag or "B" straight stitches, as needed; letting ends of ribbon hang free as shown. Sew ribbon in a 1 1/2" loop on right side of cover, as shown. Glue 3" length of sequined round trim to back with Designers Dries Clear Glue opposite front ribbon loop. Sew large button for closure to trim.
Print 3-4 copies of the whole sheet of French Romance clip art from the Somerset Clip Art CD (12 Published Somerset Clip Art/clipart17) or color copy your free sheet from the July/August 2006 issue of Somerset Studio). Trim and adhere pieces to line the entire inside surface of paper mache book. Select the image of the edge of aged book pages from the Clip Art CD (02 Book Covers & Pages/pages3) or take a digital photo of the page edges of an old book in your possession and re-size the image to 2 3/4" wide. Print 3-4 color copies on legal size paper. Lay printed pieces over "page" edges of paper mache book as template and trim and overlap as necessary to cover all three sides. Adhere with clear glue.
Place one card from the Renew Green Box O' Cards from DCWV on the inside front cover of the book, place a pencil mark on either side of card (3/8" from sides and 1 3/4" from top); pierce hole through cover of book. Insert two Decorative Pewter Brads, splay brad attachments, place piece of Gaffer Tape over ends to secure brad. Wrap one end of 9" pieces of Bronze Mist ribbon to each brad. Adhere card, flap side up, between brads to inside front cover with clear glue.
Place a mark along center of sides, 4 1/4" from bottom; pierce hole through and place two decorative pewter brads. Follow same instructions above for brad placed on the "pages" side of book. For brad placed on the "spine" side of book, cover attachment portion of brad with clear glue, then insert brad in hole; let dry. Wrap one end of 10" pieces of Bronze Mist ribbon to each brad.
Clip together the back and front of 8 green cards (flap side up) using Clipiola Italian Paper Clips, graduating the height of each card by 1/2". Place glassine envelopes inside each card "folder". Place inside book and tie ribbon across card folders.
Store Clip Art CD in front cover folder, and extra clip art pieces in the glassine envelopes.
*To change color of images in Photoshop: Select image. Select from Menu: Image/Adjustments/Selective Color. Then in the drop down box, select: Neutrals. Adjust Cyan, Magenta, Yellow and Black until you find the color that suits you.


