Creating Autumn Ambiance
Posted by Stampington & Company on Sep 25th 2020
This article by Sarah Heron was originally published in Somerset Holidays & Celebrations Volume 9.
I am a Floridian who absolutely adores autumn; the glorious colors in the trees, a nip in the air while trick-or-treating, a crackling fire when we gather for Thanksgiving, and mornings spent sipping mulled cider while frost crunches under my feet. My vision of autumn might seem idealized and far too whimsical, but that’s because it exists mostly in my imagination. As a Floridian, I often trade moody fall days for the perk of planting an early spring garden and spending long summers at the beach, but when I’m still using the AC in November, all I want is to re-create the charms of the elusive fall season.
Every year I resolve to bring autumn to life inside my home with handcrafted decorations. We make paper chains, hang wreaths, and decorate with gourds, hay, bats, and scarecrows, but my favorites are always the pumpkins. To me, pumpkins are the ubiquitous sign of autumn. I love them in all shapes, sizes, colors, and construction, with a bent toward vintage style, of course.
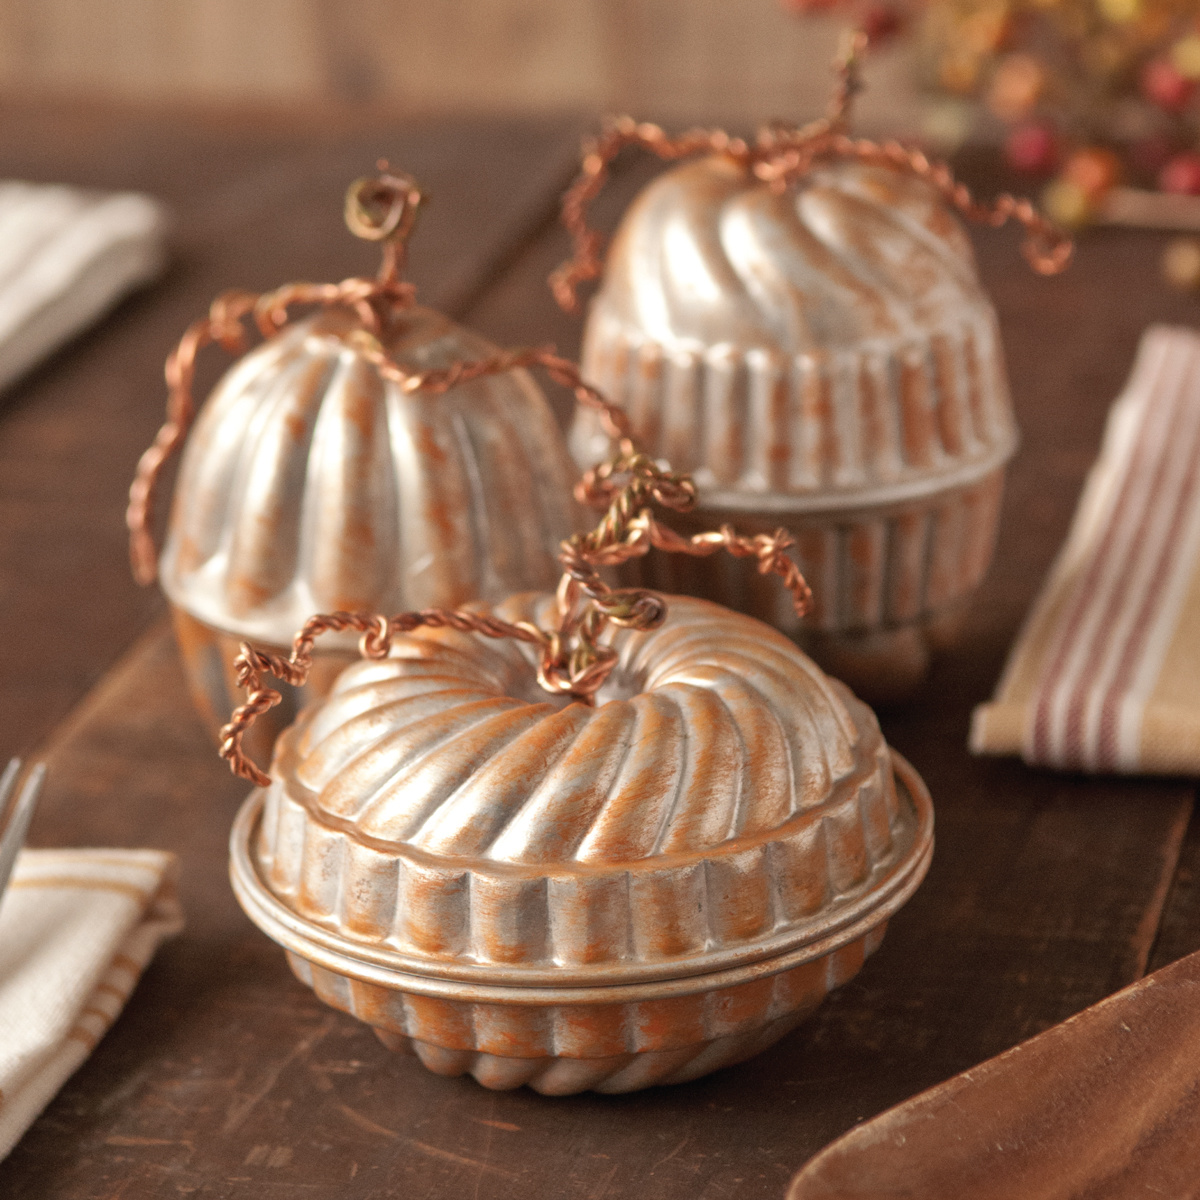
That’s where these precious tin gelatin molds come in to play. These cute little tins caught my eye one afternoon while I was estate sale treasure-hunting. I had no plan for them, but I couldn’t leave them behind. I figured they would end up on a shelf in my studio with all of the other irresistible vintage bits that I had collected. And for many months, that’s just what happened. Then one day, while stacking and restacking, sorting and tidying, my daughter left a pile of the tins inverted on each other … and inspiration struck! They looked like the cutest little pumpkin patch, with all their patina and dents and history. I could picture them nestled on a mantle with the warm glow of candlelight bouncing off the old metal, or as part of a centerpiece surrounded with colorful leaves, welcoming the ambiance of autumn into my home.
Tools & Materials
- Acrylic paint
- Flat-nosed pliers: (2)
- Metal patina: Rust & Moss (Vintaj)
- Paintbrush
- River rocks
- Stronghold adhesive: (E6000)
- Suede/Leather scraps
- Tin gelatin molds: matching sets
- Vintage ribbon/lace/seam binding (optional)
- Wire: copper, 14-ga.
- Wire snips
Technique
Stack matching molds to form pumpkin shapes; bend or straighten the rims to make them line up. I found that many of the vintage molds were bent a little out of shape. If the molds form a tall and skinny pumpkin, you will need to glue small river rocks inside the bottom mold for added stability.
Using the tip of flat-nosed pliers, poke a hole in the top of the pumpkin, and twist to create a hole approximately ¼ inch in diameter. The metal is very soft, so this should be easy. To form the stem, cut a piece of wire about 12 inches long, fold in thirds, and twist tightly using both pair of pliers. Leave one end with about 1 inch untwisted. Thread the untwisted end into the hole at the top of the pumpkin, and spread the wires as flat as possible against the inside of the mold. Cover the flattened prongs with a generous amount of stronghold adhesive, and add a square scrap of suede over the glue and prongs to secure the stem if necessary. Hold until the glue begins to set.
For molds without a lip on the edge, cut a strip of suede the circumference of the inside of the mold and about 1 inch wide. Glue the strip to the inside edge of the bottom mold, leaving half of it above the rim; let dry. When the stem and suede are dry, add glue to the edge of the bottom mold where it meets the leather. Stack the top mold on the bottom mold, making sure the edges are in line, and wipe away any excess glue. If there is an existing lip on the molds, this step will be easy. If there is no lip, the suede strip will help keep the glue in place and adhere the two halves together.
While everything is drying, the curly vines can be prepped. Cut a 16–22-inch piece of wire for each pumpkin. Fold the wires in half and twist as before. When the glue has dried, fold the wire twists in half around the stem wires to secure. A small drop of glue can be used here but isn’t necessary.
Dry-brush the pumpkins and stems with metal patina or acrylic paint. Once dry, the stems and vines can be given a final shape using the pliers. Fabric, ribbon, lace, or other scraps can be added tied around the stems.
Sarah Heron is a jewelry designer, upcycler, and vintage treasure hunter who makes her home in a little house in the big woods of Ormond Beach, Florida. She shares her little house with her firefighter husband, her 4-year-old sparkle-loving daughter, an ever-faithful dog, and a grouchy old cat. Follow along on Instagram (@Vagabond.and.Myth) to see her creations and catch a glimpse behind the scenes at her creative process. Sarah can be reached directly at sarah.heron@gmail.com.


