
12 Days of Christmas Shabby Frame Project
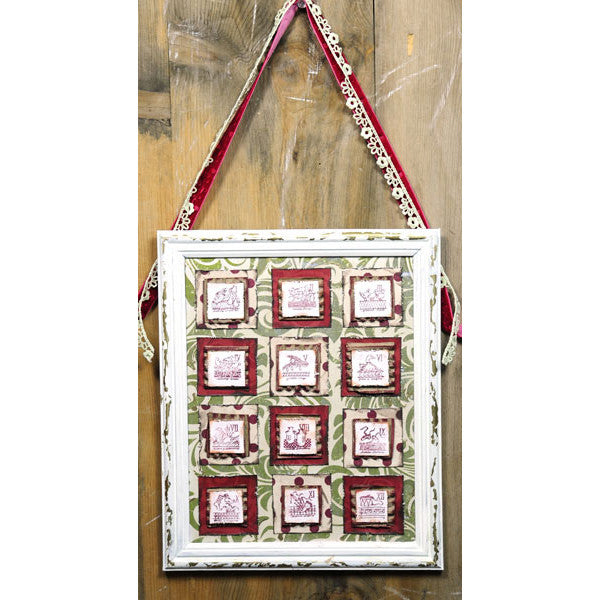
The frame was purchased at a local discount store. It was originally black, but I painted it with white acrylic paint. Once the paint had dried, I used the light gold foil and glue from the Christine Adolph Earth foil kitand doodled randomly over the frame, attaching the foil with the burnish technique. The foil kits come with clear instructions on how to use them.
For the stamping artwork, cut a piece of the green patterned paper to fit the size of the frame. Then use the squeegee tool from the Inkcessories kit and spread the opalite inker (which is included in the kit) over the paper. This will give it a sheer look and tone down the color of the green just slightly. Doodle gold foil around the edges of the green background cardstock.
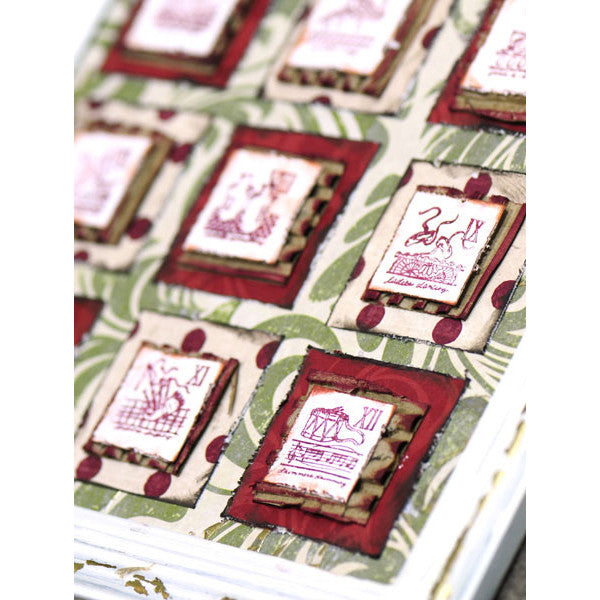
Cut 6 pieces of red and 6 pieces of the red polka dot cardstock down to 2" x 2" and distress the edges using a paper distressing tool. Ink the edges with an inkpad; I used the Pinecone VersaColor inkpad. Cut 12 pieces of corrugated cardboard down to approximately 1½" x 1½" and ink the edges using the Burgundy VersaColor inkpad. Cut 12 pieces of 1½" x 1¼" pieces of white cardstock. Distress all the edges using an edge distresser tool, then ink the edges using the Bark VersaColor inkpad.
Using the 12 Days of Christmas acrylic stamp set, stamp all the 12 days onto the white squares using the Burgundy VersaColor ink pad. Attach all the pieces by layering. The 2" x 2" squares are glued first, then the 1½" x 1½" pieces of corrugated cardboard, and finally the white 12 days of Christmas squares. Attach green and red ribbon to the back of the frame to create a loop from which to hang the frame. Hang in your home or office, or give as a holiday gift!
Free Shipping on Subscriptions
Easy 60 Day Returns
Friendly Customer
Support


12 Days of Christmas Shabby Frame Project
Frequently asked questions
Looking for a quick answer? Here are some of our customer’s most frequently asked questions to help you along the way.
Thanks for your interest in our magazines! We encourage you to visit our Calls & Challenges page to see what our editors are looking for.
Ready to begin? Here is where you can find our Submission Guidelines.
Our subscriptions ship directly from our printer in Wisconsin. For this reason, we need to be notified of your change of address at least two months before the next issue comes out, or it will be sent to the address we had on file and provided to our printer at the time it was due.
How to Notify Us About Your Change of Address
- Email the following to customerservice@stampington.com:
- The publication(s) you subscribe to
- Your name and new address
- Your old address
2. Call to inform us of your new mailing address:
- Toll-Free: 1-877-782-6737 or International: 1-949-380-7318
Mail Forwarded by the Post Office
If you forward mail to your new address through the Post Office, it won't apply to periodicals/your magazine subscription unfortunately. Also, since mail forwarding only lasts for a short time-frame, we request that you still notify us of your address change to prevent any service interruption to your subscription.
Stampington & Company cannot be held responsible for replacing "lost" issues from your subscription, if we did not receive your change of address request at least two months prior to your next issue's release date.
Subscription issues should arrive within the first week of the month your publication is released. Please add up to two weeks for international delivery.
If your magazine has not arrived by the 20th of the month, please contact our customer service department, so we can check to make sure nothing is amiss with your subscription, and see if you're eligible for a replacement copy. International subscribers can receive a digital version of the magazine as a replacement if one attempt has already been made to deliver the print edition to you.
Stampington & Company cannot be held responsible for postal delays or circumstances outside of our control, but we will make every effort to make it right.
We offer FREE shipping on all magazine subscriptions and instant download purchases to our customers. You can also take advantage of free U.S. shipping on select pre-orders of your favorite magazines (discounted International rates will apply). Browse our selection of Pre-Orders With Free U.S. Shipping here.
What are my shipping charges?
Shipping charges are calculated by weight, shipping destination, and speed. You will be able to choose the best delivery method for your needs at checkout.
To help keep your costs down, we offer a discounted rate of $5.95 to ship a single magazine to you (within the United States).
Need your order fast? We offer the following expedited shipping options:
- 3-day delivery
- 2-day delivery
*Please contact us if you have any questions or special instructions regarding your rush order.
What Carriers do You Use to Ship Items?


